Disclaimer

All of the topics discussed here in this blog comes from my real life encounters. They serve as references for future research. All of the data, contents and information presented in my entries have been altered and edited to protect the confidentiality and privacy of the clients.

Various scenarios of designing RPD and data modeling

Find the easiest and most straightforward way of designing RPD and data models that are dynamic and robust

Countless examples of dashboard and report design cases

Making the dashboard truly interactive

The concept of Business Intelligence

The most important concept ever need to understand to implement any successful OBIEE projects

Making it easy for beginners and business users

The perfect place for beginners to learn and get educated with Oracle Business Intelligence

Wednesday, September 21, 2011

DAC: Fail to create Index during execution plan run


Hello again

Here is something that a beginner may run into every so often when they use DAC to run informatica workflow, which is when the DAC execution plan runs fine except it fails to create table Index after the load. Or it could be shown as the following scenario:


The execution plan is completed with several failures of its tasks. We look at the detail of the task and find out that it fails at the last step of creating table Index:


We found out from the error log that it is complaining about a table space 'USERS' during Index Creation attemp:


As far as when 'USERS' got into this, I have no idea. Usually when we create table in a DB, we use Tablespace. I won't go into detail about what is tablespace and all that. In our case, we use a Tablespace called 'ETL_DW_INDX' for all of the index creation when we create these tables in the target DB. I am assuming that DAC is still looking for tablespace 'USERS' for all of its tasks during run time.

This leads our investigation of this issue to a new direction. Is there a place in DAC that specifies what Index Tablespace it is using for the given Database? Well, it turns out that is yes. It is defined at the physical data source under 'SET UP' tab, so let's go there!
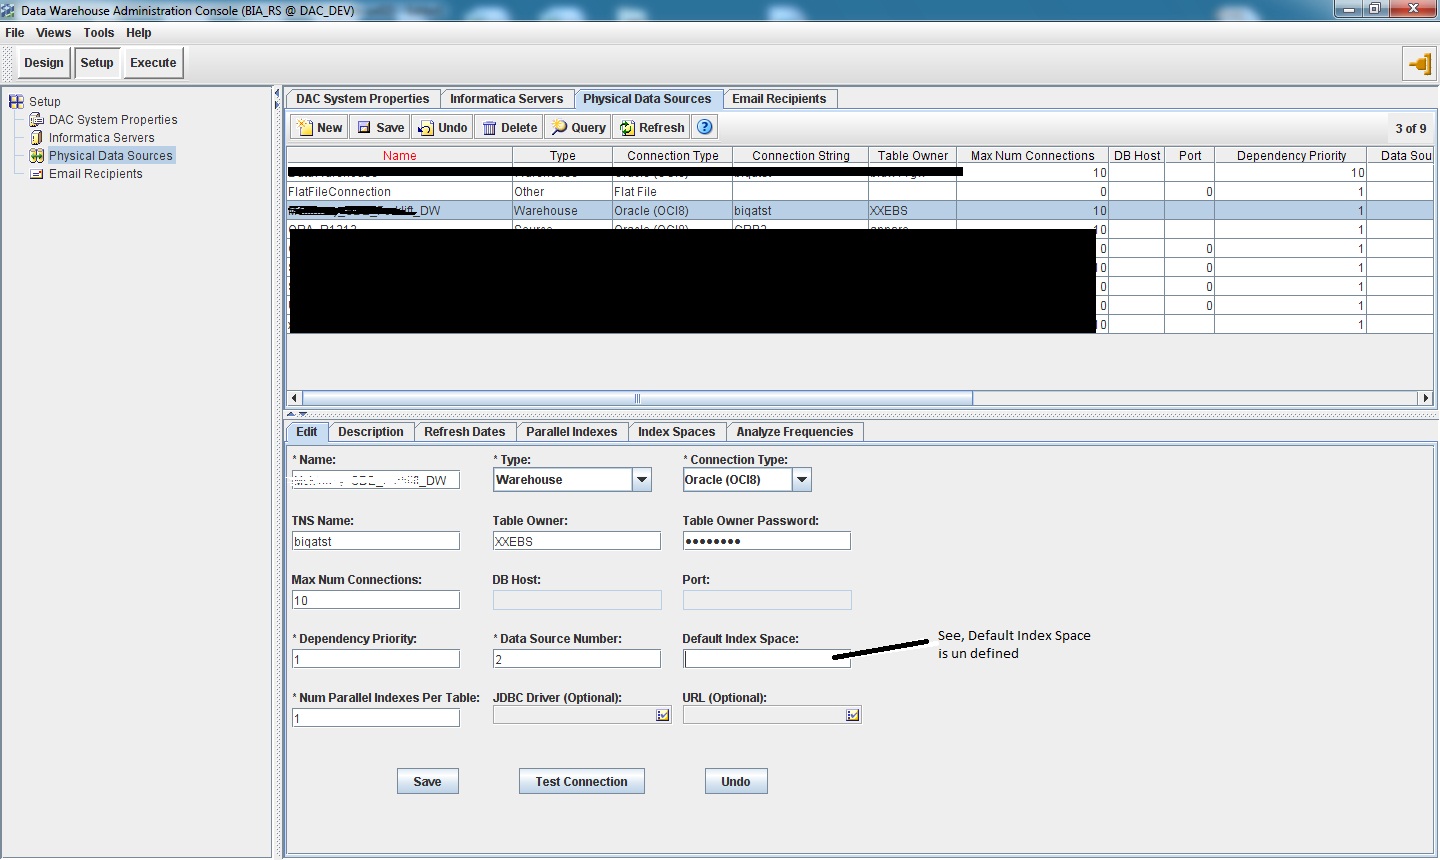

As we can see, it is originally empty for the fleid 'Default Index Space'. This may explains why we see 'USERS' in the error log while we know we are creating Indexes in the Database using 'ETL_DW_INDX'. So, let's tell DAC to use 'ETL_DW_INDX':


After that, let's re-run the execution plan and see how it turns out!


It all succeeded!

So in summary, if we are using specific Index tablespace when creating Indexes in the DB, we need to tell DAC to use that tablespace by defining it in the specific Physical Data Source info. This information will be used by DAC to run create-index tasks during execution plan run.

Thanks

Until next time!

Tuesday, August 23, 2011

A practical intro guide to Oracle Data Admin Console (AKA DAC) Part 5 -- when Index is involved


I decided to add one more part to the previous series about basic working of DAC. I realized that I forgot to address the situation where table Index is involved in the test environment I set up for previous demonstration. It is absolutely worth addressing here but we WILL deal with tables that have indexes.

So let's start with the following error scenario:

We have task running with completion in DAC:

But this workflow is giving an error about Index:


As indicted in this session log in Informatica:


This means that the Indexes for the target table was not being able to drop during the ETL load, therefore the workflow is returning such error. Now in order to resolve this error, DAC needs to be able to drop those indexes and recreate them after ETL Load. So we start by importing Index into DAC for the target table that we went through in the previous series:


Import both Indexes for table: AR_RECEIVABLES_TRX_ALL:


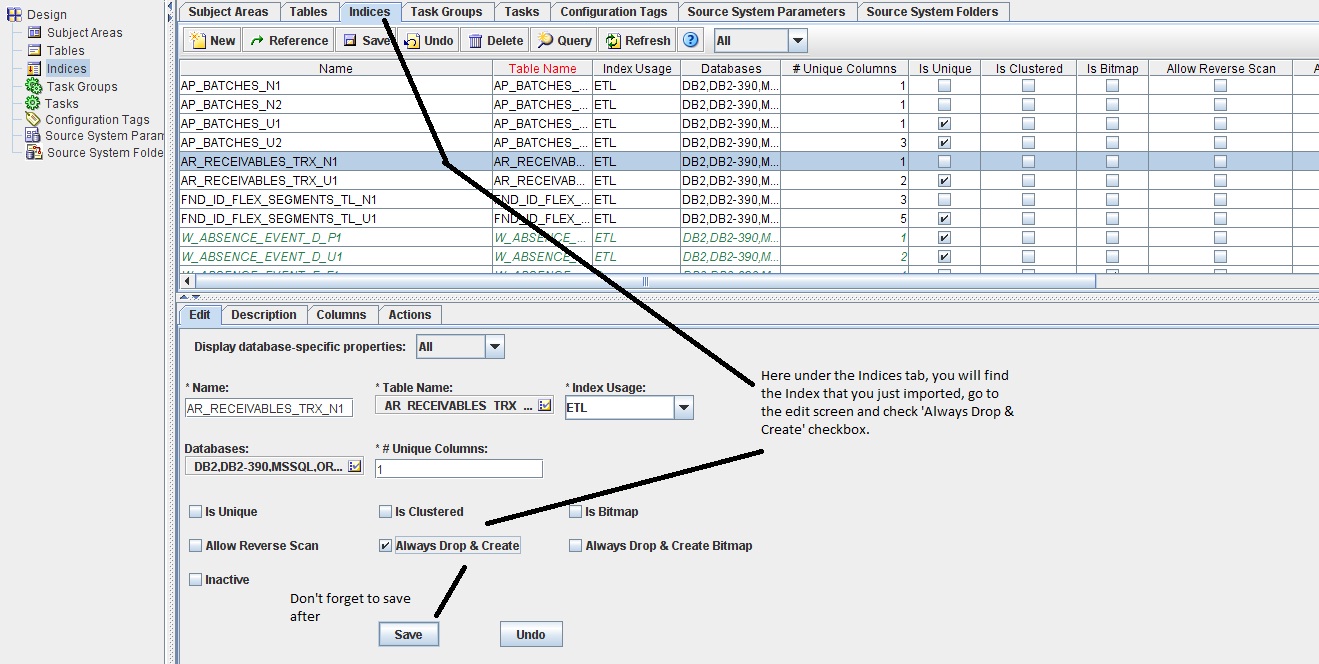
Then go into each of the indexes that we just imported, we tell DAC to drop them before the ETL load:


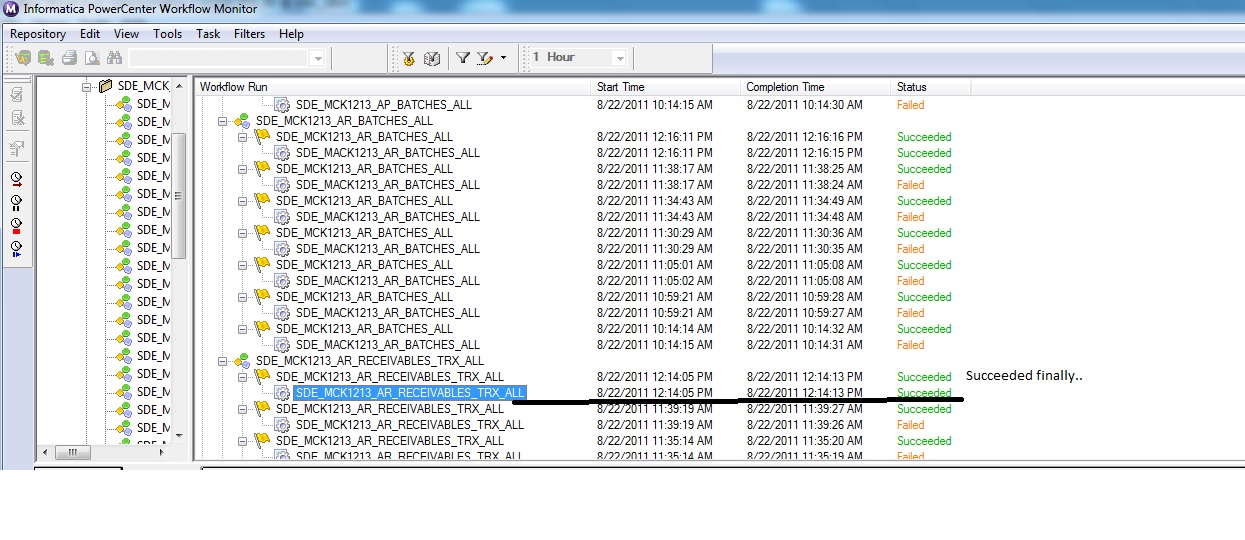
Now, let's re-run our execution plan and see what happen:


And success this time


If you want to know more about the functionality of DAC at a deeper level, please go through the DAC user guide, or contact me for any questions..

Thank you

Sunday, August 21, 2011

A practical intro guide to Oracle Data Admin Console (AKA DAC) Part 4

Based on everything we have done in Part 3 of the series, we have come to the final configurations, which is to build subject area and execution plan:

To creating subject area like mentioned in part 4:


The subject area name is MCK_Forklift_SDE and the task being added to it is
SDE_MCK1213_FND_LANGUAGES. I had added another task to this subject area previously, therefore we have 2 task entries here in this example. Don't be surprised.

Very important, after manually adding the tasks to this subject area, don't forget to assemble this subject in order for all the changes to be generated and saved:


Now once the subject area is created, let's move on to creating an execution plan. The execution plan is what will be scheduled or run manually on demand. One execution plan can have many subject areas, which can also have many tasks and task groups. In order words, one execution plan can have a bundle of tables, tasks, subject areas, parameters and other dependencies. It can get fairly complex depending on the requirement, but for the purpose of this article, let's stick to the simple and basic ones as shown below.


Remember the parameters defined in the session properties? The parameter file won't be generated until we generate parameters in the execution plan. The 'generate parameter' step is important. Make sure the value of each parameter matches the DB connection name in Informatica and the folder name value matches the name of the physical folder name created earlier:


After that is done, let's 'build' the execution plan:


This 'build' process will automatically add the tasks to the execution plan based on the subject area the execution plan has, the following window will pop up during the build process to indicate what will be 'built' to this execution plan:


After that is done as we can see from the below screenshot that the execution plan is built with 2 'ordered tasks' underneath. That's exactly what I expected. Now the next thing is to simply run this execution plan to see if it works:


Go to the 'current run' tab to see the status of this task:


We can also see the status from informatica's workflow monitor. Notice the timestamp from both applications matches, so we know the executed DAC tasks do show up correctly in Infa's workflow monitor:


As we can see, the tasks have been completed successful, we have just completed this flow of configuration. Now if you want, you can use the scheduling feature to schedule this execution plan to run at your desired time and frequency. I won't go there this time.

I hope this series help. I highly recommend to read the DAC guide again to reinforce the information we just went through.

Thanks

Until next time.

Friday, August 19, 2011

A practical intro guide to Oracle Data Admin Console (AKA DAC) Part 3

In Part 2 we went over the basic setup in DAC, so the next is building tasks:

To build task, simply go to Design --> Task --> New:


In the 'edit' tab, we start filling in the fields. Notice there are two fields: commend for incremental load and commend for full load. Usually, when creating informatica workflows, there are 2 separate sessions, one for full load and another for incremental load. For simplicity, I only create 1 workflow, therefore in these 2 fields, just enter the name of the informatica workflow name.

In the 'folder name' field, enter the name of the logical folder name that we created.

The primary source and primary target field is where we enter the parameter name of the DB source and target that is defined in the session property in informatica workflow manager.


If you want to know the detail of every field under task, please refer back to the DAC guide for more info

Now that the basic info are entered, we then add the source table and target table under this task using the table we already imported earlier:


Now that a task is create, we then need to create the subject area. The subject are will be eventually used by the execution plan that we will build.

Stay tuned for part 4

Wednesday, August 17, 2011

A practical intro guide to Oracle Data Admin Console (AKA DAC) Part 2

Picking up from part 1, let's continue on:

Log in to DAC first:


After logging in, an interface like below is likely to be what you will see:


Ignore the objects you see because a lot of what you see from the image are pre-configured stuffs. Our goal is to create a new process in DAC that will handle the informatica workflow that I just created, so assume nothing exist for now(well, except the custom container that I will take it for granted this time), there are a couple of setups we need to have in order for DAC to communicate with Infomatica and the DB so that our workflow can work. We need:

New physical datasources

New source and target DB tables that is defined in Informatica mapping

New physical and logical folders that refer to the informatica workflow folders

So, let's start by creating new physical datasource first:


Notice the name of the new physical datasource has to be the same name as the database connection name used in Informatica session. So in this case we have ORA_R1213 and Mckinsey_SDE_Forklift_DW.

After having done that, let's get on to importing new tables using the datasource we just created (DAC document will show you other ways to create these tables as well, read more if interested ):


Now, let's create the physical and logical folders.


Remember, the physical folder has to refer to the repository folder that exist in Informatica workflow manager, the logical folder will be used by DAC task, and logical folder has to associate to a physical folder.

Knowing that, I have created 1 physical folder called SDE_MCK_Forklift and 1 logical folder called Mckinsey_Extract_Forklift, and associate them with one another:


So now that we have the physical/logical folders ready, the necessary DB tables in place, we are now ready to build task.

Stay tuned for part 3
Related Posts Plugin for WordPress, Blogger...