Disclaimer

All of the topics discussed here in this blog comes from my real life encounters. They serve as references for future research. All of the data, contents and information presented in my entries have been altered and edited to protect the confidentiality and privacy of the clients.

Various scenarios of designing RPD and data modeling

Find the easiest and most straightforward way of designing RPD and data models that are dynamic and robust

Countless examples of dashboard and report design cases

Making the dashboard truly interactive

The concept of Business Intelligence

The most important concept ever need to understand to implement any successful OBIEE projects

Making it easy for beginners and business users

The perfect place for beginners to learn and get educated with Oracle Business Intelligence

Wednesday, February 20, 2013

Upgrading OBIEE from 10G to 11G and post upgrade activities Part 1


So we have successfully installed OBIEE 11G in my linux machine and we even applied a patch successfully,  now let's take what I have in the 10G environment, the rpd, web catalog files and turn it into 11G version. An upgrade process is called for.

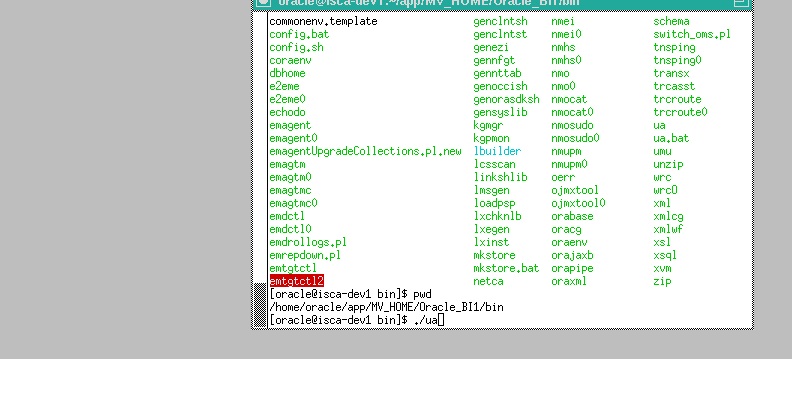
After installing 11g, in its directory under 'Oracle_BI1/Bin' folder, there is the upgrade utility, so just start running it:

$ Oracle_BI1/Bin: ./ua

The upgrade utility window pops up, which will guide through the rest of the upgrade. Since I am still connected to my environment through VHC that I previously set up, the $Display variable has already been set when I was going through installation.


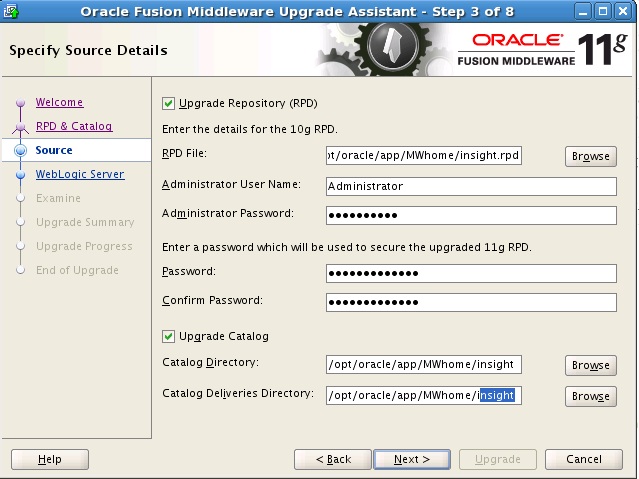
Next page, we choose to upgrade both RPD and Catalog:


The rpd and web catalog files from 10g has been copied on to this computer, therefore the next step is to enter the path of these 2 files. New username and passwords are also defined here.


The next step is to enter weblogic related information:


The rest of the steps are very straightforward, no more configuration needs. Just let the system does its thing and the upgrade will be done. A 11G version of RPD and WebCat will automatically be placed in the right 11G directory and the NQSconfig,INI file will have a proper entry done. There is no need for any manual edition.

There are a few little things we need to do to ensure our 11G environment is ready to run, These changes are typically done once after the upgrade:

1. Configure the Administrator user account in 11G:

Since 11G has a very different security management system, the Administrator account, which was managed in the Admin Tool in 10G will need to be configured in the weblogic to ensure access using this account. To do so, go to Weblogic console (under 'My realm') and edit the Administrator user by clicking on it:


Give a new password:


Release Configuration, test logging into Web Presentation using this new password. You will be able to log in as Administrator now


2. Chances are in your 10G environment, you have edited the instanceconfig.xml file to increase the number of rows allowed in your report. I did that too. So now in 11G, the content of the instanceconfig,xml file changes, therefore some of these entries will have to be re-edited for it to work the same way in 11G.

Below the highlighted the text increases the number of max rows for my report, just like I had done in 10G. Now I will have to insert these text into the following location for the 11g's instanceconfig.xml file.


3. I had configured the session time out period in 10g by editing the instanceconfig,xml file. In 11G, these things can be configured in the UI of weblogic:

therefore, the entries I made in the instanceconfig.xml file will be removed.


4. Chances are, some of the newly upgraded reports throws the following error:

It's basically complaining about the setting of evaluate_support_level parameter in the nqsconfig.ini file.


In this case, just edit the file and set the parameter to 2 and then restart the services:


There could be other post upgrade issues, this relate depends on the cases and how your project is implemented before the upgrade. In these cases, we will just have to deal with them specifically.

For example I am running into some issues that messes up my calculations on some of the reports, if you want to know more about what it is and how to fix it, you can read it here.

Thanks

Until next time

Saturday, February 16, 2013

Applying patches for OBIEE 11G

After installing OBIEE 11.1.1.6.0, I have decided to apply a big patch, as a result of this action it will upgrade my current version to 11.1.1.6.5. I will go over how this is done in my environment.

The current version after the installation:

Now comes the steps:

1. Download and extract the following zip files to my linux machine and unzip them


p    14665284_111160_Linux-x86-64.zip 
p    14696072_111160_Generic.zip 
p    14733370_111160_Generic.zip
      
      2. Take a backup of the existing 11G

      3. Stop the BI Process:

      $ cd $ORACLEBI_HOME/instances/instance1/bin
$    $ ./opmnctl stopall
$    $ cd $ORACLEBI_HOME/user_projects/domains/bifoundation_domain/bin/
$    $ ./stopManagedWebLogic.sh bi_server1
$    $ ps -ef | grep Node|grep nodemanager | cut -c10-15
k    $ kill all return PIDs
$    $ cd $ORACLE BI_HOME/user_projects/domains/bifoundation_domain/bin/
$    $ ./stopWebLogic.sh
     

      4. Clear OBIEE Catalog binary cache. This step is usually not needed for the immediate upgrade after refresh installation. But if you have used the existing environment for a while and then do the patching, it's better to clear the cache on some of the existing catalog folders.

$    $ cd $ORACLEBI_HOME/Oracle_BI1/bifoundation/web/catalogmanager/configuration
$    $ rm –rf org.eclipse.osgi
$    $ rm –rf org.eclipse.equinox.app


      5. Set environment variables:


      $ export ORACLE_HOME=/opt/oracle/obiee/Oracle_BI1
      $ export PATH=$ORACLE_HOME/bin:$PATH
      $ export JAVA_HOME=$ORACLE_HOME/jdk
      $ export PATH=$JAVA_HOME/bin:$PATH
      $ export PATH=$ORACLE_HOME/OPatch:$PATH


       6. Navigate to each of the unzipped patch folder and enter the following commend to apply patch:

       $ cd 14696072
       $ opatch apply
       $ cd 14665284
       $ opatch apply
       $ cd 14733370
       $ opatch apply


7     7. Process goes and now validate and see if the patches are applied:


       $ cd $OBIEE_HOME
       $ opatch lsinventory
       The above patches should be displayed in the list of applied patches.

       8. Generate Boot.properties:


$ cd $ORACLEBI_HOME/user_projects/domains/bifoundation_domain/bin/
$ ./startWebLogic.sh -Dweblogic.system.StoreBootIdentity=true
$ Enter weblogic username and password when asked
$ wait for few minutes


       9. Copy boot.properties to bi_server1
$ cd  $ORACLEBI_HOME/user_projects/domains/bifoundation_domain/servers/
$ cp AdminServer/security/boot.properties bi_server1/security/boot.properties


      10. Start all of the services back up. If you are not sure what is the order to get 11g started, you can visit this article 

      Now after logging into the newly updated 11g front end, you should see the result of applying this patch and now the application is upgraded to 11.1.1.6.5


      Next time, we will talk about how to upgrade RPD files and Webcatalogs from 10G to 11g.

      Thanks

      Stay tuned


Thursday, February 14, 2013

Install OBIEE 11G on Linux part 3 --- Installing OBIEE 11G

Previously RCU has been run and completed, now it's time to install OBIEE 11G. Oh, I forgot to mention that the version I am installing is 11.1.1.6.0, which is pretty buggy.

Remember those 3 disks or 5 zip files we unzipped into 'bishiphome' folder? We will go there (under Disk1) and run the installer file to launch the installation wizard:


Here are the rest of the steps:

1. Choose Enterprise Install:

2. Checking prerequisites and passing:


3.  Create the username/password, this will later be used to log in to weblogic consoles and EM interface:


4. Choose the location where OBIEE 11G will be installed:


5. Next screen, just click all of them:


6. Now we need to refer the schema created from RCU process done previously:

What I entered in my case:


7. Next screen. Just choose Auto Port Configuration


8. Security update option comes next. I usually skip this, you can feel free to subscript to this option as you wish


9. Summary of all of the setting we have done so far:


10. Upon clicking 'Install', the process kicks off:


11. Final Completion:


This is the whole process of installing OBIEE 11g. Upon successful installation, the weblogic server, node manager and BI Components are automatically in running state. You can immediately log in (username/password will be what you created in step 3) to your 11g front end interface. By default, what you will get the sample demo dashboards and reports until you start creating your own or start upgrading your 10g stuffs.

Next time, we will talk about applying patches for this version of 11g.

Stay tuned


Monday, February 11, 2013

Install OBIEE 11G on Linux part 2 --- Installing RCU

From the previous entry, we have covered all of the prerequisites and getting the system fully ready, the only thing missing from there was pressing the button. So now, let's press that button and kick off RCU.

Because the 11G architecture is different, before the actual installation of 11G, repository and schema need to be created and by referenced later during the 11G installation, therefore this step must be done before 11G installation.

1. First page of the RCU

2. After clicking 'Next':


3. Next page is to check Prerequisites as well as entering the SYSDBA account credentials that is required to connect to the Database (system/manager in my case). Please read the previous article to understand what the requirements. Without selecting SYSDBA as role, the installation will fail later. If this machine doesn't have the DB, then the same RCU needs to be run on that machine as well.

4. Prerequisites met:


5. Create passwords for the schema we are about to create here. This information will be used later during 11g installation:


6. Map table space;


7. Summary of what has happened so far:


8. Creation process completion


That is it. Now we are ready to install OBIEE 11G

Stay tuned for the next entry

Saturday, February 9, 2013

Install OBIEE 11G on Linux part 1

Hello

Today I want to talk about the detail process that I went through to install OBIEE 11G and setting up the entire OBIEE development environment. In my case, I was given a Linux machine and told that I was free to do anything with it as long as I install OBIEE 11G there and use it as development environment.

Doing it from scratch forced me to evaluate everything about the environment, so let me start by going over the prerequisites that my machine needs to have before doing the installation.

1. Depending on the OS versions, OBIEE might require certain library files. The missing files will be informed during the initial environment check when installing OBIEE. Moreover, OBIEE 11G needs to connect to the Database. In my case, we are using Oracle DB. So 2 scenarios are presented:

A: If installing 11g on the same machine where Oracle DB is installed, then it the DB and Oracle DB Client tools should already be there.

B: If installing 11g on a different machine and intend to connect remotely to the DB Machine, then Oracle DB Client is needed. Also, RCU needs to be ran on that machine as well because chances are, the sysdba user of that DB Machine is not accessible directly from this machine.

If using other DB, please check the requirements

2.  Add the following lines into /etc/security/limits.conf
*           hard                nofile              10240
*           soft                  nofile              10240


Test it as root user to verify ulimit setting

3. Download and move all of the OBIEE 11G files as well as RCU zip files to the Linux machine and unzip them:

Unzipping RCU files:


Unzipping OBIEE 11G files:

4. The RCU and the 11G installation are done through a windows UI, therefore the displaying of it in Linux or Unix environment needs to be set up by configuring the $Display environment variable. In my case, things are done by accessing Linux through VNCviewer and the display is set at 4:


Now ready to run RCU:


Continuing on to the next entry

Stay tuned!

Tuesday, February 5, 2013

Starting OBIEE 11G Service Components --- For Server bi_server1, Node Manager Associated with Machine not reachable

Hello again.

So I have installed OBIEE 11G, now what do I do to bring everything up so I can log in and see the 11G dashboards?

I am assuming you have the basic understand of OBIEE 11G architecture, or at least you know the relationship between weblogic and BI Components. So from there, the first time we do is to start the weblogic services.

Take my Linux environment for instance, you navigate to the following directory and run the weblogic start script:

/MWhome/user_projects/domains/bifoundation_domain/bin/startWebLogic.sh

Having done that, you should be able to log in to the UI of Console and EM.

Once I am in, I am trying to start the bi_server1, yet I run into the following error:

For Server bi_server1, Node Manager Associated with Machine not reachable


This tells me that I need to make sure the node manager is up and running.  This time, I navigate to the following the directory where node manager script is located:


MWhome/wlserver_10.3/server/bin/startNodeManager.sh

Upon running the script, I encounter the following error:


This indicates that I have to see whether the port number that Node Manager is configured is used or not. By default, the port number is 5556, however in our environment, it was 9556. So do the following:


Here it shows that for 9556, there is 4642 that is running, so we need to kill it:


After doing that, we need to run the SetWLSenv script, this will set the environment for weblogic, after that, we re-run the node manager start up script:


After that, we resume the bi_server1 and now it is successful:


Next, we move on to the EM interfaces and start the BI components. But before doing that, we need to start the OPMN by going to the following directory:

/oracle/product/middleware/instances/instance1/bin/opmnctl

And run the opmnctl script:


After that, start all of the BI Components in EM UI:


Thanks

Until next time.
Related Posts Plugin for WordPress, Blogger...