So like I said before, I need to find a way to fool OBIEE into thinking these prompts are the same first of all. The first difference I see is that the date prompt in one dashboard is using a between operator while the other prompt is split into 2 date prompts having equal operator for each. So I decide to split the first prompt into 2 and define the same expression in the prompt to make it the same as the other prompt.
Of course, I have to make sure that the functionality of the original prompt is kept the same. I am doing it by assigning presentation variables to both new prompts.
Now, moving onto the prompts on dashboard 1 and see what we can do about that. Since there is only 1 date prompt on dashboard 1, I will not make an effort to further configure it. That will, only 1 date prompt value from dashboard 2 will be passed to dashboard 1.
The main effort here is to configure the hour prompts on dashboard 1 so that it will be treated the same as dashboard 2.
Being aware of the fact that the hour prompts in dashboard 2 needs presentation variable (time scale granularity) to determine its content, we will have to make it the same in dashboard 1. But we have to do it in such way that these prompts still present the same values even if there is no presentation variables being chosen because it doesn't need it at all.
For the start hour prompt, I have entered the following expression:
Starthour: case when '@{varDateSelect}' = 'Hour' then Date."Hour Number" when '@{varDateSelect}' = 'Day' then null else Date."Hour Number" end
So in this case, when vardateselect is unspecified, the content will still be Date."Hour Number defined in the 'else' clause.
For end hour prompt, I have entered the following expression:
end hour: case when '@{varDateSelect}' = 'Hour' then Date."Hour Number" when '@{varDateSelect}' = 'Day' then null when 1=1 then Date."Hour Number" end
This is the same logic as start hour. The only difference is that I have 'when 1 =1' as a condition. This is to fool OBIEE into thinking that these 2 prompts are different so that they each will allow different prompt values at the same time without being synchronized by OBIEE. Yet, both expression will yield the same result.
The below 2 expressions will also be defined in the hour prompts on dashboard 2. That way, OBIEE will look at them as the same, mean while the functionality of the prompts on dashboard 2 will remain the same because the prompt values will always be according to the vardateselect variable, which means the 'else' condition will never be used.
Now, let's create some reports to deal with passing the LSP values:
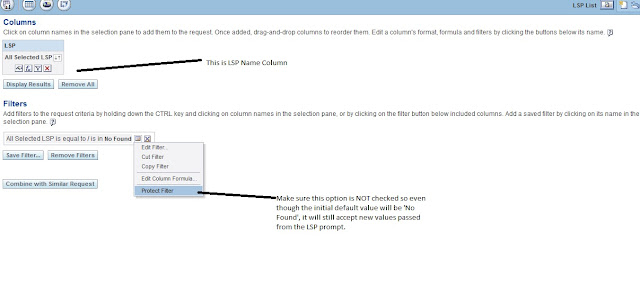
This report will return list of LSPs and the column header and value will be holding the navigation path to dashboard 1. More importantly, the default filter value for this report is 'Not Found', which means initially the report will always return nothing until a new prompt value being passed.
Now lets put it all together on dashboard 2:
Here as you can see, I have defined the guided navigation on the section that holds this LSP report. That way initially, this report is invisible from the dashboard like illustrated from below:
Now let's test the feature by selecting the date and hour range, LSP names on dashboard 2 and click 'go'. You should see that the LSP report being rendered and the results will show shortly:
The below shows the reports based on the selected values from the prompts on dashboard 2. You can see the LSP report having both header and data highlighted. So the idea is that by clicking on the header, all of the LSPs coming from the multi-select prompt will be passed along to dashboard 1. If clicking on a specific LSP, then only that LSP will go through along with the dates and hours.
So let's check it out by clicking and we get to dashboard 1:
As you can see, all of the dashboard prompts on dashboard 1 are filled with values coming from dashboard 2, because OBIEE thinks they are all the same so accepted the interaction.
Of course, another way of defining the navigation is by embedding a navigation link on the dashboard like so:
and the dashboard display will be like this:
This works just as well as the first one.
Thanks
Until next time


0 comments:
Post a Comment